Axes.
In previouse steps you have used to rotate and move objects in front view and
it was quite intuitive - while moving objects, you dragged them with mouse,
 while rotating - objects spinned clockwise or counter clockwise. I have left
one important thing behind explanation of these tools - an axes.
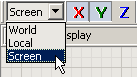
Axes in ZModeler affect variouse tools and you should pay attention
which axes are currently selected. Take a look into Axes Toolbar in a
top of ZModeler and click on "Screen" to see which axes are available. They are:
while rotating - objects spinned clockwise or counter clockwise. I have left
one important thing behind explanation of these tools - an axes.
Axes in ZModeler affect variouse tools and you should pay attention
which axes are currently selected. Take a look into Axes Toolbar in a
top of ZModeler and click on "Screen" to see which axes are available. They are:
Next to the axes mode selection, there are three Axes buttons: "X", "Y" and "Z". They have the same color as according axes in tripod and the same color as object's local axes. By pressing certain button - you specify which axes will be used in modification. So, for example, if you want to drag object only along world X axis, you need to switch to "World" and press "X" button in toolbar. Then you can drag object and it will be restricted in freedom of movements to world X axis.
Screen axes mode requires some more explanation. In this mode, "X" axis is a viewport's horizontal axis (so you can move left or right only), "Y" axis is a viewport's vertical axis (you can move up or down) and when both X and Y axes buttons are pushed (just like on the image above) it's a "viewport plane", so you can move left, right, up or down. Sometimes this "XY Screen mode" called non-constrained mode (since object is not constrained in freedom of movement). What screen "Z" axis is? Screen "Z" axis is a direction of view: you look into scene along "Screen Z axis". By moving an object in "Screen Z" axes mode, you will pull it toward or push it away. So, for example, moving an object in front view in such a mode will result in moving of this object to the viewer or away from the viewport (you will notice changes in side, top or perspective view of such a movement, but not in front view). You should practice with Move tool and different axes modes. Screen and World modes are recommended for practice. You should be very familiar with screen axes mode in orthographic views, and with world axes in Perspective view.
Here I also suggest you to study manually how Modify\Scale tool works and how axes modes affect it's behaviour.
Then reset scene by selecting File\New in main menu and change axes mode to default "Screen XY" mode.
Highligting objects.
Create a big box in front view and then create a small box inside this
big box like on the left image. If you will try to highlight small box with
mouse cursor in front view, ZModeler will not let you to do so - it will always
highlight the bigger box because it was created first (it's listed before
small box in objects browser) and mouse cursor actually highlights it. This
is a very common situation, and even worse, there might be a situation when you
can not use another viewport (where objects do not overlap) to highlight what
you need to be highlighted. In such a case, you can move mouse cursor over an
object you need and hit  button and ZModeler will
highlight "next" object under cursor - so, you can reach an object you need.
button and ZModeler will
highlight "next" object under cursor - so, you can reach an object you need.
Reset the scene with File\New command and create several small stacked
boxes starting from bottom of view and going to it's top. Then move mouse
cursor in top view over these boxes and hit
key several times - you will see how
highlight will chage. Then hit  button and all
(or almost all, depending how many boxes are under cursor) will be highlighted.
As you guess, you can drag all these boxes at a time with Modify\Move
when they are highlighted in such a way. But what to do if you have no chance
to highlight required objects this way, but still need to move (or rotate, scale
or whatever else) them all in once? An answer follows.
button and all
(or almost all, depending how many boxes are under cursor) will be highlighted.
As you guess, you can drag all these boxes at a time with Modify\Move
when they are highlighted in such a way. But what to do if you have no chance
to highlight required objects this way, but still need to move (or rotate, scale
or whatever else) them all in once? An answer follows.
Selected mode.
 ZModeler has a so-called Selected Mode to manipulate several elements at
a time. This is a widely used mode and there are lots of tools that work with
respect to this mode - the mode when several elements (objects, or their
components) are selected for modifications. You can switch this mode
on/off by pressing Spacebar or by pressing a button in status bar. When
this button pressed (it turns red), zmodeler will work with selected
elements. All you need now is to know how to select and deselect elements.
ZModeler has a so-called Selected Mode to manipulate several elements at
a time. This is a widely used mode and there are lots of tools that work with
respect to this mode - the mode when several elements (objects, or their
components) are selected for modifications. You can switch this mode
on/off by pressing Spacebar or by pressing a button in status bar. When
this button pressed (it turns red), zmodeler will work with selected
elements. All you need now is to know how to select and deselect elements.
Selection tools.
Selection tools are all in Commands bar under Select... label. The most recently used are:
 If you are curious person, you have porbably held mouse cursor over Quadr
tool and read the hint in status bar: it prompts to "Right-click and drag to
select..." What is worth noticing is that right mouse button is used for
this (and all other) selection tool(s). So, pick Select\Quadr tool,
right-click in front view and, holding right mouse button down, drag a rectangle
over some of boxes you have created earlier.
Then release right mouse button and objects inside rectangle area will be
selected and will turn into dark red color. Red highlight in ZModeler is,
in general, a color of selected items - used for selected polygons, vertices,
splines and almost all elements. Even selected mode button, when pushed,
turns red.
If you are curious person, you have porbably held mouse cursor over Quadr
tool and read the hint in status bar: it prompts to "Right-click and drag to
select..." What is worth noticing is that right mouse button is used for
this (and all other) selection tool(s). So, pick Select\Quadr tool,
right-click in front view and, holding right mouse button down, drag a rectangle
over some of boxes you have created earlier.
Then release right mouse button and objects inside rectangle area will be
selected and will turn into dark red color. Red highlight in ZModeler is,
in general, a color of selected items - used for selected polygons, vertices,
splines and almost all elements. Even selected mode button, when pushed,
turns red.

Now drag, with right mouse button down, a rectangle that coverts any selected box (e.g. the one in the middle). Then press
key and release right mouse button. The object inside rectangle area will be
deselected:

You have several objects selected, selected mode is ON (button is pressed), pick a Modify\Move tool and drag objects in any view - you will see that selected objects are moving all together.
You can keep selection on objects: Turn selected mode OFF and move (or modify in any other facion) any desired object - you don't need to deselect, turning selected mode OFF is enough.
One thing you should notice is that Modify\Move and Select\Quadr tools can be pushed in commands bar together. This means that you can have these tools be active (and ready to work) together. Move tool uses only left mouse button, and all Select... tools use only right mouse button - they do not "conflict". You can pick Rotate and a lot of other tools that use only left mouse button and Select\Quadr tool will remain active until you pick a tool that "conflicts" with it. For example, a Box primitive creation tool in main toolbar uses right mouse button to cancel creation process - it "conflicts" with Seqlect\Quadr tool. So, if you pick Box primitive tool in toolbar, Select\Quadr will become inactive and commands bar will collapse "Select..." branch.
Other selection tools work in the same fasion as "Quadr" tool. Some of them will be described later, where their certain benefit will be required.