Context Menu.
I haven't written earlier about ZModeler2 context menu. This is a floating menu which pops up when you right-click on something in the view or over the label in Objects brower. Usually, context menu is just a short-cut version of most recenlty used tools, but in ZModeler it contains several tools that are not mentioned neither in main menu, nor in commands bar. In this lesson some of such a tools will be used.
First of all, create a grid surface in top view (with "Create\Surface\Grid" tool). We shall learn a pair of similar tools in context menu. They are Convert To -> Triangles and Convert To -> Quad. The first one works on polygons level and the second - on edges level.
If you have created a quad-based surface, switch it to polygons level,
right-click on any quad and pick in context menu "Convert To\Triangles". The
quad will turn to triangles:

Once you pick "Triangles" in context menu, a quad will turn into a pair of
triangles. You can convert several quads this way. Once you have converted
enough quads or if you have created triangle-based grid surface, you can
convert to quads. Switch to edges level, highlight an edge that belongs to
two triangles and right-click on it:
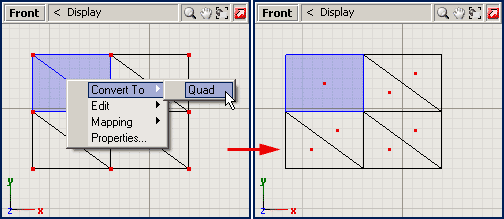
Once you pick "Quad" in context menu, neighbour triangles will form a single
quad. I've switched to polygons level to show what has changed. You should
practice with these tools, since they will be used quite often.
By default "Q" is a hotkey for "Convert To\Quad"; "Shift-Q" is a hotkey for "Convert To\Triangles". Using hotkey, instead of items in context menu, way more quickier.
Flat Shading.
 Once you have messed with grid surface a little, switch to vertices level and
pull/push some vertices in top view in "Screen-Z" axes mode. You should come
up to a randomly distorted shape, like the one on the right. What is remarkable
here is that even surface is no longer flat, all it's polygons are shaded with
the same grade of gray color (bright gray is a default shading color). You can
spin in perspective view to see this. Evenmore, if you change perspective view
to 3D view (no wire lines drawn in 3D view - only solid polygons) you will hardly
recognize the actual shape - there will be a silhouette shaded. This has happen
because vertices normals were not updated after moving vertices - all
vertices reflect the light in the same direction, and all polygons do the same,
regardless whether polygon turned to the viewer (and to the light source) or it
turned a little away. ZModeler offers an alternative way of shading the mesh, a
so-called Flat-Shaded mode. In this mode vertices normals do not affect
surface shading. Instead, a polygon orientation (how it is directed to the
viewer and light source) is used.
Once you have messed with grid surface a little, switch to vertices level and
pull/push some vertices in top view in "Screen-Z" axes mode. You should come
up to a randomly distorted shape, like the one on the right. What is remarkable
here is that even surface is no longer flat, all it's polygons are shaded with
the same grade of gray color (bright gray is a default shading color). You can
spin in perspective view to see this. Evenmore, if you change perspective view
to 3D view (no wire lines drawn in 3D view - only solid polygons) you will hardly
recognize the actual shape - there will be a silhouette shaded. This has happen
because vertices normals were not updated after moving vertices - all
vertices reflect the light in the same direction, and all polygons do the same,
regardless whether polygon turned to the viewer (and to the light source) or it
turned a little away. ZModeler offers an alternative way of shading the mesh, a
so-called Flat-Shaded mode. In this mode vertices normals do not affect
surface shading. Instead, a polygon orientation (how it is directed to the
viewer and light source) is used.
 Flat shaded mode can be switched on/off on per-objects basis. You should switch
to objects level, right-click on a grid surface and pick Properties in
context menu. Once properties window pops up, expand a Rendering\Technique
branch and checkmark a Flat Shaded line. Image on the left shows how it
should look. Once you click OK, a surface will be rendered in flat shaded mode.
You can spin a perspective or 3D view to notice difference. All polygons are
shaded with a grade of gray color, depending on how they turn to the viewer. In
this mode the actual shape of the distorted grid is easily recognizeable: even
in 3D view without wireframe lines.
Flat shaded mode can be switched on/off on per-objects basis. You should switch
to objects level, right-click on a grid surface and pick Properties in
context menu. Once properties window pops up, expand a Rendering\Technique
branch and checkmark a Flat Shaded line. Image on the left shows how it
should look. Once you click OK, a surface will be rendered in flat shaded mode.
You can spin a perspective or 3D view to notice difference. All polygons are
shaded with a grade of gray color, depending on how they turn to the viewer. In
this mode the actual shape of the distorted grid is easily recognizeable: even
in 3D view without wireframe lines.
Flat-Shaded mode is very useful while modelling a shape. It eliminates the need of careing about vertices normals. Evenmore, in this mode shading updated while you modify the shape. For example. you can pull/push vertices and notice that shading changes in perspective view while you use Modify\Move tool. This can be used when shading is used to shape surface properly.